What CapCut 템플릿 Actually Are (and Why They Matter)
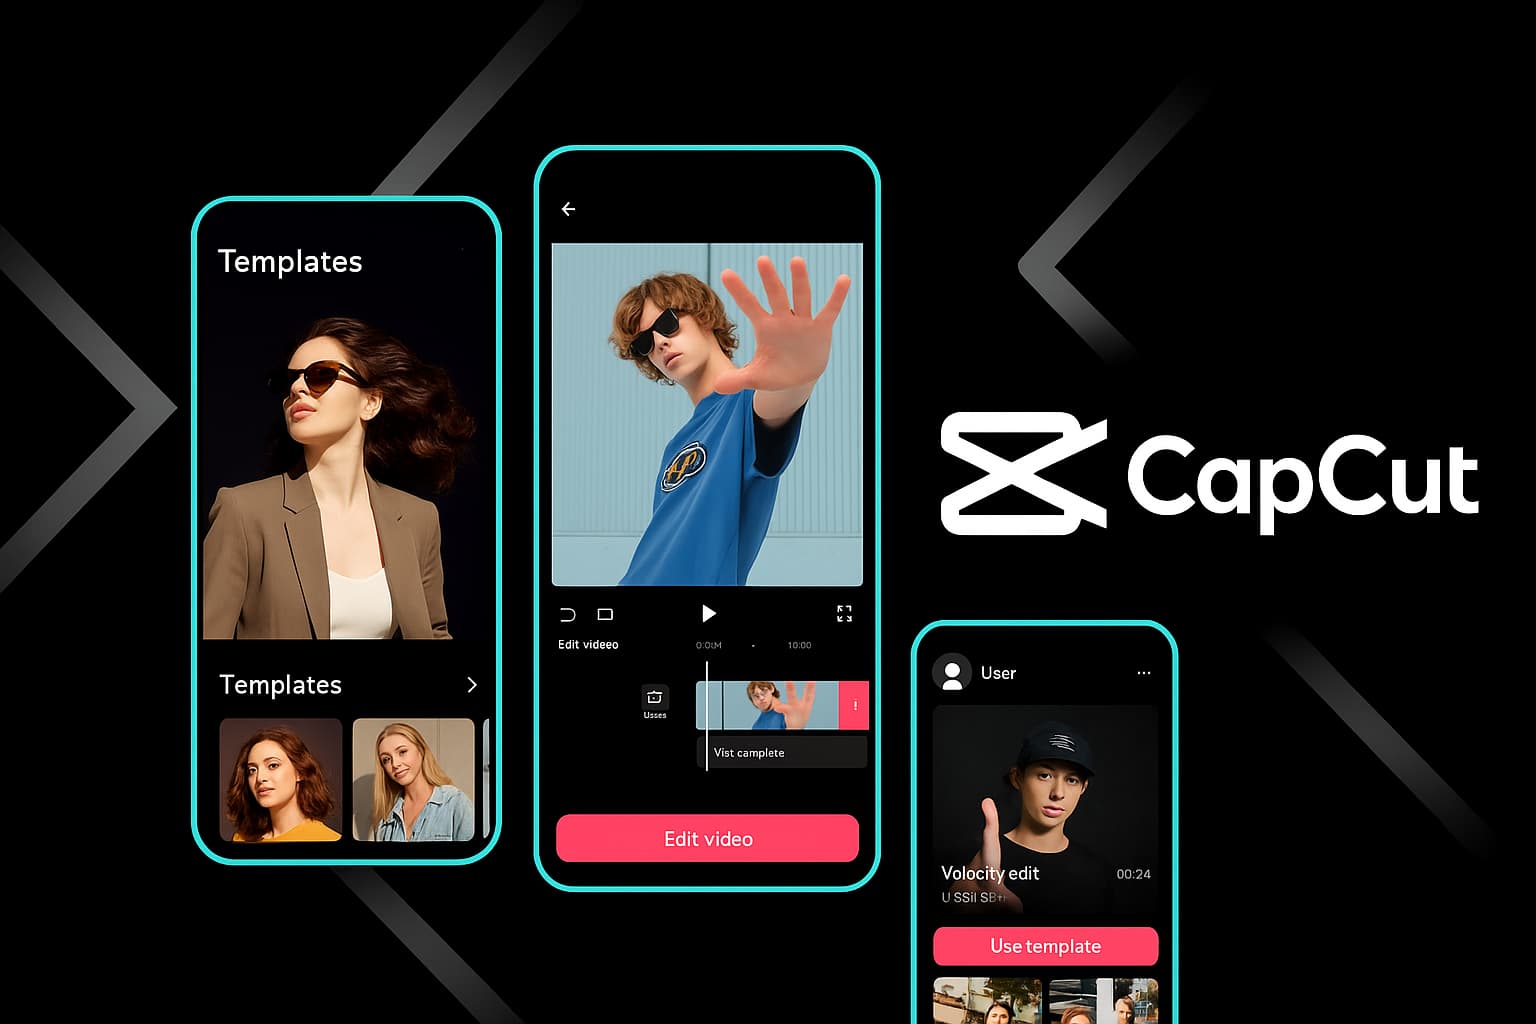
A CapCut 템플릿 is a pre-built video project — complete with transitions, music, text animations, effects, and timing — where you swap in your own clips and hit 보내기. That's the surface-level answer. The real answer is more interesting.
I spent a weekend pulling apart about 40 popular 템플릿 to see how they're built. Each one is essentially a mini production blueprint. The creator has already solved the hard problems: which transition fits after a beat drop, how long each clip should hold before cutting, where text appears and disappears, and how effects layer without looking cluttered. You're getting someone else's editing decisions packaged into a reusable format.
That distinction matters. A filter changes how your video looks. A 템플릿 changes how your video flows. The pacing, the rhythm, the structure — these are the things that separate a video people watch to the end from one they scroll past in two seconds.
CapCut currently hosts thousands of 템플릿, and new ones appear daily. They range from simple three-clip slideshow formats to complex 20+ clip productions with synchronized beat-matching, parallax effects, and layered text. The free library alone is massive — I've never hit a point where I couldn't find something usable without paying.
Something I noticed early on: 템플릿 created by users with high usage counts tend to have tighter timing and cleaner transitions than the generic library 템플릿. Sort by popularity first — it's a genuine quality signal, not just a vanity metric.
Where to Find CapCut 템플릿 (All the Spots People Miss)
Most people open the 템플릿 tab and stop there. That works fine, but you're only seeing a fraction of what's available.
The Built-In 템플릿 Library
The obvious starting point. Open CapCut, tap 템플릿 at the bottom (mobile) or click it in the top bar (desktop). You'll see trending 템플릿 organized by category — For You, Trending, Business, Vlog, Gaming, and more. The algorithm learns your preferences over time, so the "For You" section gets better the more you use it.
What most people miss: the search bar in the 템플릿 section accepts very specific queries. Type "beat drop transition" or "three photo slideshow" and you'll get targeted results that generic browsing would never surface. I've found some of my favorite 템플릿 this way — deep in the library, barely any usage count, but perfectly suited to what I needed.
TikTok Shared 템플릿 Links
This is the hidden goldmine. When creators on TikTok make videos using CapCut 템플릿, many include a "CapCut - Try this 템플릿" link in their description or as a sticker on the video itself. Tapping that link opens the 템플릿 directly in your CapCut app. You skip the entire browsing process and land on a 템플릿 you've already seen in action.
In my experience, the best 템플릿 circulate through TikTok before they trend in CapCut's own library. If you want to be early on a 템플릿 trend, watch TikTok. The 템플릿 showing up in creator videos today will be saturated in CapCut's "Trending" tab next week.
Community Creators and 템플릿 Makers
Some CapCut users build 템플릿 as their primary content. They publish new 템플릿 weekly, often tied to trending sounds or seasonal events. Following a few reliable 템플릿 creators means you always have fresh options without digging through the library yourself.
Search "CapCut 템플릿 creator" on TikTok or Instagram and you'll find accounts dedicated to this. Bookmark the ones whose style matches yours.
Ready to Browse 템플릿?
Jump into CapCut's 템플릿 library and find your next viral video format.
Open CapCut 템플릿The 템플릿 Categories Worth Your Time
아니요t all 템플릿 categories are created equal. After testing hundreds of them across different content styles, here's where the real value sits.
TikTok Trending 템플릿
These update constantly. A 템플릿 that's trending today might not even appear in search next month. The advantage: using a currently trending 템플릿 gives your video a recognition factor. Viewers subconsciously register the familiar format and are more likely to watch it through. I've seen engagement rates double just from matching the trending format of the week.
The downside is saturation. If millions of people use the same 템플릿, yours needs stronger content to stand out. My approach: grab a trending 템플릿, use it for the structure, then manually adjust at least two things — the transition timing and the text placement. Small changes that make it feel less cookie-cutter.
Instagram Reels 템플릿
Reels 템플릿 tend to be shorter and punchier than TikTok ones. The best Reels 템플릿 are built around quick cuts, clean text overlays, and music-synced transitions. They prioritize visual polish over complexity.
One pattern I noticed: Reels 템플릿 that use a simple three-act structure — hook shot, content sequence, closing shot — consistently outperform more complex 템플릿 on Instagram. The algorithm seems to reward 템플릿 where viewers don't have to think about what's happening structurally.
Business and Brand 템플릿
Product showcases, service introductions, announcement videos, sale promotions — these 템플릿 are surprisingly well-designed in CapCut. The color schemes are professional, the text animations are clean without being distracting, and the pacing suits commercial content.
For anyone running a small business social media account, these 템플릿 are a genuine time-saver. I've helped three small business owners set up their social content workflow entirely around CapCut business 템플릿. They went from posting once a week (because editing felt overwhelming) to posting daily.
Vlog and Lifestyle 템플릿
Longer clip durations, softer transitions, ambient music. These work for travel content, day-in-the-life videos, and montage-style edits. The good ones give your clips room to breathe instead of cutting every second.
Photo Slideshow and Memory 템플릿
Drop in photos instead of video clips. Great for birthday compilations, anniversary posts, year-in-review content, and memorial videos. The photo 템플릿 add subtle motion (Ken Burns effect, parallax, gentle zooms) that make still images feel cinematic.
Step-by-Step: How to Download and Use CapCut 템플릿
The process differs slightly depending on your device. Here's the exact workflow for each platform.
On Mobile (iOS & Android)
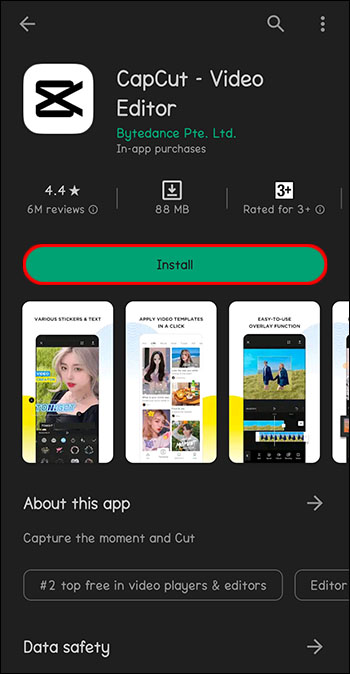
- Open CapCut and tap the 템플릿 tab at the bottom of the screen. If you don't see it, update your app — older versions bury it in a different menu.
- Browse or search. Use the category tabs at the top (Trending, For You, Vlog, etc.) or tap the search icon and type keywords. Specific searches like "slow motion reveal" outperform vague ones like "cool 템플릿."
- Preview the 템플릿. Tap any 템플릿 to see it play with sample footage. Pay attention to the clip count shown — it tells you how many clips you'll need. If it says "5 clips" and you only have 3 good ones, pick a different 템플릿 or prepare to get creative with B-roll.
- Tap "Use 템플릿." This opens the clip selection screen. Select your footage from your camera roll in the order you want them to appear. CapCut will auto-fit them into the 템플릿 slots.
- Customize. Once loaded, you're in the full editor. Change text, adjust clip positions within their slots, tweak the music volume, or swap out the audio track entirely.
- 보내기. Tap the 보내기 button (top right), choose your resolution — 1080p for social media, 4K if you need archival quality — and save or share directly.
Quick win: Before selecting your clips for a 템플릿, trim them in your gallery app first. 템플릿 auto-fit your clips, which sometimes means the best moment gets cropped out. Pre-trimming gives you control over which part of each clip the 템플릿 uses.
On Desktop (Windows & Mac)
- Open CapCut Desktop and click 템플릿 in the top navigation bar or on the home screen.
- Browse the library. Desktop gives you a wider view — you can see more 템플릿 at once and the preview player is larger. Use this advantage to really evaluate 템플릿 before committing.
- Click a 템플릿 to preview. The desktop previewer shows you the exact 타임라인 structure, which is helpful for understanding how the 템플릿 is built.
- Click "Use 템플릿" to load it into a new project. Import your footage into the media panel, then drag clips into the 템플릿 placeholder slots on the 타임라인.
- Refine in the 타임라인. Desktop gives you granular control. Adjust each transition's duration, change the easing curves, fine-tune text positioning pixel by pixel. This level of control is the main reason I do final 템플릿 customization on desktop even when I browse 템플릿 on mobile.
- 보내기 from File > 보내기 or the 보내기 button. Desktop exports are faster than mobile, and you get more format options including ProRes for high-quality workflows.
On CapCut 웹 편집기
- Go to capcut.com and log in. Navigate to 템플릿 from the dashboard.
- Search or browse. The web 템플릿 library is slightly smaller than mobile but includes the most popular options.
- Select and load. Click a 템플릿, then click "Use this 템플릿." Upload your footage through the browser upload dialog.
- Edit in the browser editor. The web editor handles 템플릿 customization well for basic changes — text edits, clip swaps, and color adjustments. For heavy modifications, I'd still recommend downloading the desktop app.
- 보내기 and download. The web editor exports directly to your downloads folder or lets you share via link.
Download CapCut and Start Using 템플릿
Available free on mobile, desktop, and web. 아니요 watermarks, no hidden fees.
CapCut 무료로 시작하기Customizing 템플릿 Like a Pro (아니요t a Copy-Paste Creator)
Using a 템플릿 straight out of the box works. But customizing it even slightly puts you ahead of 90% of people who use the same 템플릿 with zero changes. Here's what I do with every 템플릿 I use.
Swap or Adjust the Music
템플릿 music is chosen to match the transitions, but it's also the most recognizable element. When thousands of videos use the same audio, yours blends into the noise. Swapping to a similar-tempo track from CapCut's audio library — or a trending sound from TikTok — keeps the 템플릿's timing feel while sounding fresh.
If you keep the original music, at least adjust the volume. Most 템플릿 set music louder than necessary. Dropping it 15-20% makes the audio feel less aggressive and more polished, especially if you're adding voiceover.
Adjust Transition Timing
This is the single highest-impact change you can make. 템플릿 transitions are set to match the default music. If your clips have different energy than the sample footage, those transition points might feel off. Shifting a transition by even half a second can transform the feel of the entire video.
On desktop, you can see the audio waveform in the 타임라인. Align your transitions to beat peaks in the waveform — that's the secret behind every 템플릿 that feels "perfectly synced."
Add Your Brand Colors and Fonts
If you're creating content for a brand or personal brand, change the 템플릿's text colors to your brand palette. It takes 30 seconds and makes the output look intentional instead of templated. Same with fonts — CapCut has a wide font library, and swapping from the 템플릿's default to your brand font creates consistency across your content.
Remove the CapCut Outro
Some 템플릿 include a CapCut branded ending clip. Scroll to the end of your 타임라인 after loading the 템플릿 — if you see a short clip with the CapCut logo, just select it and delete. Your exported video will be completely clean.
Adjust the Aspect Ratio
템플릿 are built for specific ratios (usually 9:16 for TikTok/Reels). If you need to repurpose for YouTube (16:9) or Instagram feed (1:1 or 4:5), change the project aspect ratio in settings after loading the 템플릿. You'll need to reposition some elements, but the core structure stays intact. I repurpose a single 템플릿 across three platforms this way regularly.
From my workflow: I keep a "템플릿 kit" — a note with my brand hex colors, my two go-to fonts, my audio volume preferences, and my 보내기 settings. Every time I load a 템플릿, I run through this checklist. Takes two minutes and makes every video feel consistent without building from scratch.
CapCut 템플릿 vs. Other 템플릿 Sources
CapCut isn't the only place to find video 템플릿. But after testing alternatives extensively, here's why I keep coming back.
CapCut vs. Canva Video 템플릿
Canva's video 템플릿 are great for static-feeling content — animated text, simple slideshows, presentations turned into videos. But Canva struggles with complex transitions, beat-synced editing, and anything that requires actual 영상 편집 skills to build. If your content is graphic-heavy (quotes, announcements, infographics), Canva wins. If your content is footage-heavy (vlogs, Reels, TikToks), CapCut wins by a wide margin.
The editing power gap is enormous. Canva gives you drag-and-drop simplicity. CapCut gives you drag-and-drop simplicity plus a full 타임라인 editor underneath when you need it.
CapCut vs. Envato / Motion Array / Videohive
Paid 템플릿 marketplaces like Envato and Motion Array offer premium 템플릿 for Premiere Pro, After Effects, and DaVinci Resolve. The production quality can be higher — more complex compositing, 3D elements, broadcast-level motion graphics. But you're paying $15-50 per 템플릿, and you need to know the host application to customize them.
CapCut's free 템플릿 don't match that ceiling quality, but they cover 80% of what most social media creators need at zero cost and zero learning curve. I use paid Envato 템플릿 for client work with specific requirements. For my own social content? CapCut 템플릿, every time.
CapCut vs. InShot 템플릿
InShot offers 템플릿 too, but the library is much smaller, updates less frequently, and the customization options are limited compared to CapCut. InShot's strength is simplicity for very basic edits. The moment you want to do anything beyond the 템플릿's preset structure, CapCut's editor gives you far more flexibility.
CapCut vs. VN Video Editor 템플릿
VN은 견고한 무료 편집기이며 템플릿 선택이 늘어났습니다. 그러나 CapCut의 템플릿 라이브러리는 대략 10배 더 크고, 트렌드에 따라 더 자주 업데이트되며, 템플릿에서 편집기로의 작업 흐름이 더 원활합니다. VN의 템플릿은 영화 스타일에 초점을 맞추는 경향이 있는 반면 CapCut은 게임 몽타주부터 요리 콘텐츠, 기업 프레젠테이션에 이르기까지 모든 것을 다룹니다.
고급 템플릿 전략 대부분의 가이드 건너뛰기
템플릿 스태킹
아무도 이것에 대해 이야기하지 않지만 작동합니다. 인트로 시퀀스용 템플릿을 사용한 다음 비디오 본문을 수동으로 편집한 다음 아웃트로용으로 다른 템플릿을 선택하세요. 구조가 가장 중요한 템플릿(후크 및 종료)의 효율성과 실제 콘텐츠를 수동으로 편집할 수 있는 창의적인 자유를 결합하게 됩니다.
데스크탑에서는 템플릿 기반 인트로를 별도의 클립으로 내보낸 다음 이를 기본 프로젝트로 가져올 수 있습니다. 모바일에서는 템플릿 미리보기를 화면 녹화하여 인트로 레이어로 사용하세요. 해키? 아마도. 효과적인? 전적으로.
편집 학습을 위한 리버스 엔지니어링 템플릿
저는 데스크톱에 템플릿을 로드할 때 단순히 사용하는 것이 아니라 타임라인을 연구합니다. 제작자는 전환 시간을 어떻게 정했나요? 해당 텍스트 애니메이션에는 어떤 이징 곡선이 있나요? 이 특정 BPM에서 속도가 왜 그렇게 좋은 느낌이 듭니까? 템플릿은 출력물뿐만 아니라 구성에도 주의를 기울이면 무료 편집 레슨입니다.
이것이 제가 속도 램핑을 배운 방법입니다. 완벽한 속도 램프가 있는 템플릿을 찾아 데스크톱에서 열고 속도 곡선 설정을 연구했습니다. 다음 프로젝트에서 수동으로 복제했습니다. 튜토리얼을 시청하는 데 1시간이 걸렸을 내용을 익히는 데 5분이 걸렸습니다.
템플릿을 사용한 일괄 콘텐츠 생성
일주일 분량의 릴을 한 번에 제작하는 과정은 다음과 같습니다. 마음에 드는 템플릿 3개를 선택하고, 한 번에 15~20개의 짧은 클립을 촬영한 다음, 다양한 클립 조합으로 교체하는 템플릿을 순환합니다. 동일한 세 가지 템플릿, 다른 영상, 다른 텍스트 — 약 한 시간 안에 9~12개의 고유한 비디오를 얻을 수 있습니다. 템플릿은 생산 품질을 처리합니다. 저는 내용에만 집중합니다.
이 일괄 접근 방식은 템플릿이 편집으로 인한 결정 피로를 없애주기 때문에 효과적입니다. "이 전환이 어디로 가야 하는지"와 "여기에 어떤 텍스트 애니메이션이 적합한지"에 정신적 에너지를 소비하지 않으면 전적으로 메시지와 스토리에 집중할 수 있습니다.
주의하세요: 동일한 계정에서 동일한 인기 템플릿을 두 번 이상 연속으로 사용하지 마십시오. 추종자들이 이를 인지하고 알고리즘은 반복적으로 보이는 콘텐츠의 우선순위를 낮출 수 있습니다. 피드의 느낌을 다양하게 유지하려면 최소한 세 가지 템플릿 스타일을 순환하세요.
일반적인 템플릿 문제 해결
템플릿은 완벽하지 않습니다. 제가 가장 많이 겪는 문제와 이를 빠르게 해결하는 방법은 다음과 같습니다.
템플릿이 로드되지 않거나 충돌합니다. 일반적으로 모바일의 메모리 문제입니다. 다른 앱을 닫고 CapCut의 캐시를 지운 후(설정 > 저장소 > 캐시 지우기) 다시 시도하세요. 지속되는 경우 템플릿은 최신 CapCut 버전의 기능을 사용할 수 있습니다. 앱을 업데이트하세요.
클립이 잘리거나 확대된 것처럼 보입니다. 템플릿에는 미리 설정된 프레임이 있습니다. 클립을 삽입한 후 각 클립을 탭하고 위치/크기를 수동으로 조정하세요. 데스크탑에서는 미리보기 창의 변환 핸들을 사용하여 프레임을 재구성합니다. 이 작업에는 몇 분이 더 걸리지만 얼굴이나 주요 피사체가 어색하게 잘리는 것을 방지할 수 있습니다.
음악을 교체한 후 오디오가 일치하지 않습니다: 원본 템플릿의 시간은 기본 트랙으로 맞춰졌습니다. 오디오를 교체한 후 새 비트와 다시 동기화하려면 2~3개의 전환 지점을 조정해야 할 수 있습니다. 데스크탑에서 파형을 사용하거나 모바일에서 비트에 맞춰 탭하여 적절한 순간을 찾으세요.
템플릿은 데스크탑과 모바일에서 다르게 보입니다. 일부 템플릿은 데스크톱에서 다르게 렌더링되는 모바일 전용 효과를 사용합니다. 템플릿이 모바일에서는 완벽해 보이지만 데스크톱에서는 이상해 보인다면 해당 특정 템플릿에 대해서는 모바일을 고수하세요. 그 반대는 거의 문제가 되지 않습니다.
내보내기 품질이 미리보기보다 낮은 것 같습니다. 내보내기 설정을 확인하세요. 모바일의 기본 내보내기는 때때로 최대 품질보다 낮게 설정됩니다. 내보내기 설정으로 이동하여 60fps(대부분의 소셜 미디어에서는 30fps)에서 1080p를 수동으로 선택하세요. 비트 전송률은 '높음' 또는 '권장'으로 설정되어야 합니다.
CapCut 템플릿에 대해 자주 묻는 질문
예, 대부분의 CapCut 템플릿은 완전 무료입니다. 라이브러리에는 TikTok 트렌드, Reels 형식, 비즈니스 템플릿, 동영상 블로그 등 모든 카테고리에 걸쳐 수천 개의 무료 옵션이 포함되어 있습니다. 일부 프리미엄 템플릿에는 Pro 배지가 표시되어 있으며 CapCut Pro 구독이 필요하지만 무료 컬렉션이 너무 광범위해서 유료화에 거의 도달하지 않습니다. 제가 그렇게 하더라도 대개 90% 정도 좋은 무료 대안이 있습니다.
예. 번들로 제공되는 음악 및 효과를 포함한 템플릿에는 CapCut 내보내기에 사용할 수 있는 라이선스가 부여됩니다. 여기에는 브랜드 콘텐츠, 광고, 고객 작업 및 제품 비디오가 포함됩니다. CapCut Pro를 사용하는 경우 모든 프리미엄 자산(글꼴, 음악, 효과)에는 상용 라이선스가 함께 제공됩니다. 무료 계획의 경우 내장 라이브러리 자산은 CapCut 내보내기 내에서 상업적으로 사용하기에 안전합니다. 자신의 저작권이 있는 음악을 템플릿으로 가져오는 경우 해당 권리에 대한 책임은 별도로 귀하에게 있습니다.
세 가지 방법. 먼저 CapCut에서 템플릿 탭을 엽니다. 상단의 "트렌딩" 섹션에는 현재 인기 있는 템플릿이 표시됩니다. 둘째, TikTok을 탐색하고 설명에 "CapCut - 이 템플릿 사용해 보기" 링크가 있는 비디오를 찾으세요. 셋째, TikTok 및 Instagram에서 CapCut 템플릿 작성자 계정을 팔로우하세요. 그들은 종종 해당 템플릿이 메인 라이브러리의 트렌드 섹션에 도달하기 전에 트렌드와 관련된 새로운 템플릿을 게시합니다. 저는 TikTok 방법이 최고의 템플릿을 가장 빠르게 표면화한다고 생각합니다.
물론입니다. 그래야 합니다. 템플릿을 로드한 후에는 모든 요소에 대한 전체 편집 액세스 권한을 갖게 됩니다. 클립 교체, 텍스트 편집, 글꼴 및 색상 변경, 음악 및 볼륨 조정, 전환 수정, 타이밍 조정, 다양한 필터 적용 및 효과 변경이 가능합니다. 템플릿은 고정된 형식이 아닌 시작점입니다. 특히 데스크탑에서는 템플릿 작성자가 설정한 모든 단일 키프레임과 속성을 보고 수정할 수 있습니다.
대부분의 템플릿은 CapCut 모바일(iOS 및 Android), 데스크톱(Windows 및 Mac), 웹 편집기에서 작동합니다. 많은 템플릿이 모바일에서 사용자가 생성되었기 때문에 모바일 앱은 템플릿 선택 폭이 가장 넓습니다. 일부 모바일 전용 효과는 데스크탑에서 약간 다르게 보일 수 있지만 핵심 구조와 타이밍 전송은 다릅니다. 웹 편집기에는 다소 작은 템플릿 라이브러리가 있지만 가장 인기 있는 카테고리를 모두 포함합니다.
템플릿을 편집기에 로드한 후 타임라인의 맨 끝으로 스크롤합니다. CapCut 브랜드의 짧은 아웃트로 클립이 있는 경우 탭하거나 클릭하여 선택한 다음 삭제를 누르세요. 그게 전부입니다. 내보낸 비디오는 브랜딩이나 워터마크 없이 완전히 깨끗합니다. 모든 템플릿에 이 기능이 있는 것은 아니지만, 그런 경우 제거하는 데 말 그대로 2초가 걸립니다.
템플릿은 완전한 비디오 프로젝트입니다. 여기에는 클립 구조, 전환, 음악, 텍스트, 효과 및 타이밍이 포함됩니다. 영상을 추가하면 동영상이 기본적으로 귀하를 위해 제작됩니다. 사전 설정은 특정 요소에 적용되는 개별 설정입니다. 색상 등급 사전 설정은 영상의 모양을 변경하고, 텍스트 사전 설정은 제목 스타일을 변경하며, 효과 사전 설정은 특정 시각적 처리를 적용합니다. 템플릿은 전체 제작을 처리합니다. 사전 설정은 자체 프로젝트 구조 내의 개별 요소를 처리합니다.
지금 바로 템플릿 사용을 시작하세요
0에서 게시된 비디오까지 가장 빠른 경로는 CapCut 템플릿입니다. 템플릿이 지름길이기 때문이 아니라 스마트 인프라이기 때문입니다. 기술적인 제작 결정(타이밍, 전환, 속도)을 처리하므로 실제로 중요한 것, 즉 콘텐츠, 메시지, 창의적인 방향에 집중할 수 있습니다.
첫 번째 TikTok을 만들든 500번째 릴을 만들든 템플릿은 프로세스에서 마찰을 제거합니다. 내가 아는 최고의 제작자들은 템플릿을 목발이 아닌 기초로 사용합니다. 그들은 템플릿을 로드하고, 브랜드에 맞게 사용자 정의하고, 모든 비디오를 처음부터 제작했다면 불가능했을 속도로 콘텐츠를 게시합니다.
CapCut을 잡고 템플릿 라이브러리를 열고 실험을 시작하세요. 첫 번째 템플릿 동영상은 약 5분 정도 소요됩니다. 10분의 1은 2개가 필요합니다. 그리고 20대쯤에는 원본 작성자가 상상하지 못했던 방식으로 템플릿을 수정하기 시작하게 되며 이때 상황이 정말 흥미로워집니다.
지금 CapCut 템플릿을 시작해보세요
무료 다운로드, 워터마크 없음, 사용자 정의 가능한 수천 개의 템플릿. iOS, Android, Windows, Mac 및 웹에서 사용할 수 있습니다.
CapCut 무료 다운로드